Showing posts with label tips. Show all posts

Friday, December 28, 2007

Five Firefox Tips You May Not Know About

The image “http://techtalk.wfu.edu/b_mozilla_firefox.jpg” cannot be displayed, because it contains errors.
The thing I like best about Firefox is that just when you think you know everything there is to know about the browser, something new comes along and surprises you.

I discovered five new Firefox tips today. Maybe these are old hat and you know them already. Or maybe like me, you had no idea these could be done.

1. Quick search - without going to a search engine first.

Are you reading a website and you subsequently discover a word or phrase that you want to put into a search engine? Up until now, I would just open a new tab, type in the URL for Google and manually type the word or phrase in. But it seems there is a faster easier way.

Just highlight the word or phrase with your mouse’s left-click button. Then drag the highlighted text into the address bar in the browser. Then press “enter”. Firefox will now perform a “Are you feeling lucky?” Google search for you.

2. Delete visited URL’s

When you drop down the box underneath the address bar, you can see your recent browsing history. But what if you want to remove one URL from that list? Maybe you’ve been looking at a naughty site and you don’t want your girfriend to know? Or maybe you’ve been shopping for your loved one online and you want to keep it a secret?

Just drop down the URL box, highlight the URL you want to zap then press the “delete” button on your keyboard. The URL will then be removed from the list.

3. Navigate to browser tabs using the keyboard

Instead of using the mouse to click on a tab, why not use the keyboard instead? Pressing CTRL + TAB together will bounce you from tab to tab, starting from the one in the far left and working its way along. Or if you want to go to a specifc tab straight away, you can do that too. CTRL + 2 will take you directly to the second tab from the left. CTRL + 5 will take you to the fifth tab from the left.

4. Start downloads instantly

Instead of right-clicking on a download link, choosing “save to target” and pressing enter, just drag the download link to the “downloads icon” in the toolbar. The download will start automatically.

5. Grab files off webpages, even protected webpages

Have you ever wanted a picture, file or video off a webpage but you can’t, because it’s been protected? Just right-click on the page, choose “View Page Info” then the “media” tab. Find the file you’re looking for from the list and click on “save”. (note : this doesn’t work for everything but I have still had a pretty high success rate nonetheless).

Source

Monday, November 19, 2007

Installing Windows Media Player Plugin for Firefox

So you just bought a training video and popped it into your computer. You click on the menu in the autoplay dialog and it opens up Firefox, your default browser. Now you are staring at a blank screen.
What now?

The problem is most likely because you don't have the Windows Media

Player plugin installed for Firefox, so all we need to do is install it.

Note that you'll usually have the same problem anytime you try and view video files in FIrefox using Windows Media format, such as .wmv files.

Installation

Just download and run the plugin installer linked below. You'll probably want to close Firefox during the installation.

Verifying Plugin Installation

After running through the very quick installation wizard, you might be curious if the installation actually worked. While the easiest method is to just open a Windows Media video, you can also type the following into the address bar to see the list of loaded plugins:

about:plugins

And you should see the Windows Media Player plugin in the list. You can also see which file types Firefox will use the plugin on.


image


And now I can view this Windows Media format video file in Firefox…


image


Technical Notes


In case you have any issues with this installer, you might want to take a look at this list to help with your troubleshooting:


  • The WMP plugin uses the IE Proxy settings, not the ones in Firefox.
    This is because the plugin itself is only a thin wrapper around Windows
    Media Player, which always uses IE internally to fetch data.
  • The plugin files are installed to the "C:\Program Files\Mozilla
    Firefox\plugins" directory by default, and the file name is
    np-mswmp.dll. If the uninstaller fails to remove this file for whatever
    reason you can manually delete it.
  • You could also theoretically copy the same .dll file into the
    plugins directory on any Firefox installation and it should work
    without running the installer.

image


Download Windows Media Player Firefox Plugin from port25.technet.com

Source

Thursday, November 15, 2007

Speeding up VNC on Vista By Limiting Visual Effects

As a computer field tech, I use the remote desktop program UltraVNC quite often. I utilize it mostly to connect to offsite computers so I can run diagnostics and repair remotely, if needed.

Recently, I ran into an issue with UltraVNC and Vista. I was able to connect but the desktop was slow to the point of being almost non-responsive. There was no way I would be able to diagnose let alone repair anything over that connection.

After adjusting various color depth and screen resolution options without any noticeable improvement in speed, it dawned on me that I was connected to an Aero enabled Windows Vista machine. Sure enough , when I disabled Aero, the remote desktop sprang back to life.Here’s how disable all Aero features for UltraVNC sessions.

Disable Visual Effects

Right click on Computer, and choose Properties.

image

Click on Advanced System Settings, and then under Advanced, click Settings.

image

Select the "Visual Effects" tab, and then click “Adjust for best performance” and OK.

image

I've found that this dramatically speeds up the remote connection. Note that you should probably re-enable the old setting
after you are done.

Editor's note: This is a helpful way to speed up any remote desktop solution, not only for VNC.

Source

Wednesday, November 14, 2007

Unofficial Windows XP Themes Created by Microsoft

Anybody who has ever tried to change the theme in Windows will
already know that you have to hack the uxtheme file in order to install
themes into XP that aren't digitally signed by Microsoft. If you would
rather not or are unable to patch your system you might be interested
in these unofficial themes created by Microsoft.


There might be other themes out there, but these are the ones I know
about. Feel free to inform everybody in the comments if you know of any
others.


Royale


This theme is really bright and blue… Just look at all that blue…


image


To install this theme you'll need to download, extract the zipfile,
and then run the installer. When prompted for the location to save the
files, leave it set to default.


image


Now you can go into your display settings and change the theme from the list.


Download Royale Theme from Softpedia


Royale Noir


This theme was supposed to be a darker version of the regular Royale
theme, but it wasn't really finished before somebody from Microsoft
published it, and it spread all over the web.


image


After downloading and extracting the zipfile, you'll need to copy
the royale_noir folder into C:\Windows\Resources\Themes and then
double-click on the Luna.msstyles file found in that directory and
change the settings to match the above screenshot.


image


Download Royale Noir theme from istartedsomething.com


Zune Theme


This theme was released to celebrate the Zune launch, and you'll
notice it's very similar to Royale Noir, except for the kinda ugly
orange start button. Long time readers will note that we've mentioned this theme before.


image


Installing this theme is really simple… download and run the installer.


Download Zune Theme from Microsoft.com

Source

Making Menu Transparent using Compiz


Compiz brings a lot of bling to the Linux desktop, but with such an
extensive selection of configurable features, it can sometimes be
difficult to figure out how to take advantage of specific
functionality. Several readers have asked me how to use Compiz to make
menus and tooltips transparent, so I figured I'd share this trick with
the Open Ended audience.


In order to set up menu transparency, users will need the Compiz
Config Settings Manager, which can be acquired on Ubuntu by installing
the compizconfig-settings-manager package. Users can launch the utility
from the command line or from the GNOME Preferences menu. The settings
manager contains a number of tiles that provide access to various
plugins and features included in Commpiz. To set menu transparency,
select the General Options tile and navigate to the Opacity Settings
tab. Expand the Window Opacities section and click the Add button. A
small dialog window will open and prompt for window specification and
the desired opacity.


In the Opacity Windows text field, you have to input a
pipe-separated list of window types to which you want to apply the
transparency. I use the following string:


Tooltip | Menu | PopupMenu | DropdownMenu


Then I set the Opacity Window Values field to 90 to indicate that
windows of the previously specified types should be 90 percent opaque
and 10 percent transparent.


You can also use more elaborate window matching strings that use
window class, role, and title. For instance, I like to make all of my
Pidgin conversation windows slightly transparent, but not the buddy
list. In order to do that, I assign 95 percent opacity to all windows
that use the Pidgin class and use the buddy list window title to
exclude it from the match list. This is the string I use in the Opacity
Windows text box for my Pidgin transparency:


class=Pidgin & !title=Buddy List


You can also use these window matching strings with the Compiz
Window Rules plugin to automatically make certain windows adhere to
certain behaviors when they are created. For more information about
Compiz window matching rules, check out the documentation at the Compiz wiki.

Source

Tuesday, November 13, 2007

Get Vista Style Drive Icons in Windows XP

One of the nice little features in Windows Vista that you don't think about is the graph of drive space for your drive icons, so you can visually see at a glance how much space is used. There's no reason to upgrade for this feature, especially since some programmers created a small utility for XP that gives you the same functionality.

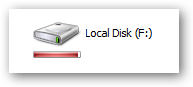
You'll notice the new icon looks very similar to the ones in Vista, but the more interesting addition is the new bar under the icon that gives you a tiny graph of the current drive space.


The graph will show up on most of the icon sizes other than the details view.


When your drive is running low on space the graph will turn red to indicate that you should probably stop downloading so much.


You can see in task manager that it really doesn't use all that much memory.


Source